
Oak sleepers are very heavy so you can also use oak rods or stainless steel poles for stability. Sleepers are so heavy they dont generally move.

Pin By Charleen Nielsen On Back Yard Landscaping Retaining Walls Garden Retaining Wall Backyard Retaining Walls
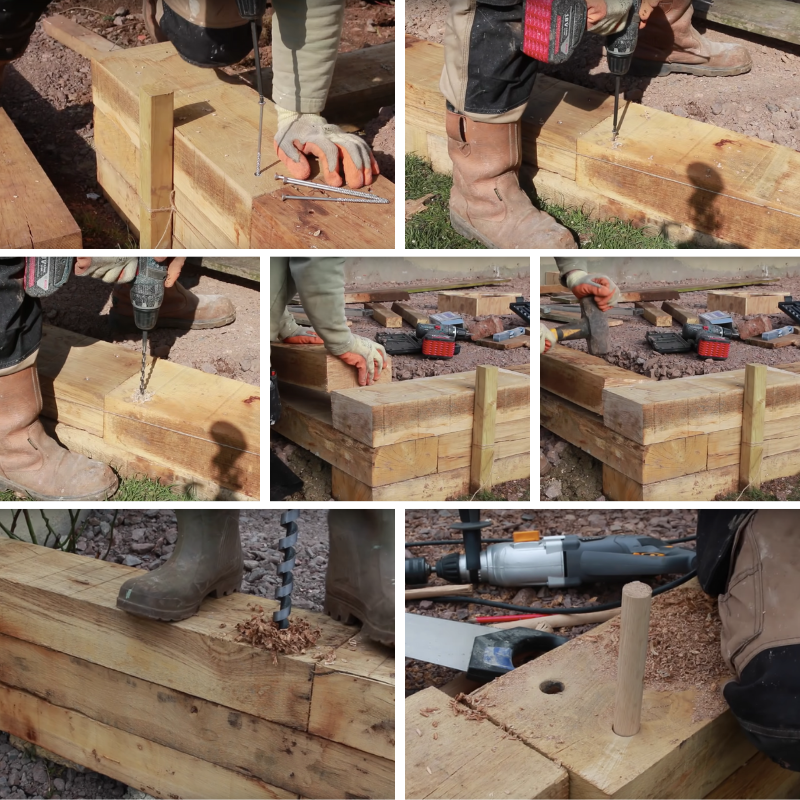
Use 10mm rodding drill a hole in the end of one sleeper then butt it up together to mark the next one then drill the second one slide together no probs doing a.

How to fix sleepers on top of each other. They can be bedded direct onto the soil. Just make sure the base is level before you lay the sleepers on top. Lay the first course of sleepers and fix by inserting metal rods through pre-drilled holes into the footings as shown above.
Back them up with references or personal experience. Liked by the question poster. Best to use two posts per sleeper maybe 400mm in from each end.
Making statements based on opinion. You need to choose screws that will penetrate significantly into both sleepers. Drill holes in the iron prior to concreting and then bolt through to your sleepers using M10 roofing bolts or similar.
If they are only 3 high then the easiest option is to use timberlock fastenings on each course as you put them up. Sink the bottom sleepers into the ground to half their depth drill holes in the sleepers at 1m centres 25mm wide by 75mm deep. Answered 13th Oct 2016.
Once youve done that you will have two or more layers sitting on top of each other but not attached TO each other. Tap 150mm long dowels into the holes fix the next layer of sleepers by locking dowels into matching holes. Working with the grain run the belt sander slowly over the sleepers until each surface is smooth.
The easiest way would be to use the timberloks but to drill into the first sleeper with a flatspade bit for a couple of inches then use a socket and extension. Lay a pond liner that covers the inside of the railway sleeper container and generously folds over the top of the railway sleepers as in the picture. They will want a post or two behind screwed to the sleepers though to stop any sideways movement.
You will now have a box shape that creates a neat border. Asking for help clarification or responding to other answers. Dont underestimate the pressure of wet soil in the winter trying to push your sleepers out of line.
Dont forget to pre-drill before putting the screw in to reduce splitting. Attach sleepers together Use two 150mm timber screws at each corner to attach the sleepers together. Youll probably want to first put some carpet or material onto the floor of the pond to cover any stones or sharp edges.
Id put the bolt and 2 washers. Adding a small chamfer to the edges of your sleepers is a simple way to add a. As mentioned above its important to use stainless steel crews to fix your sleepers together.
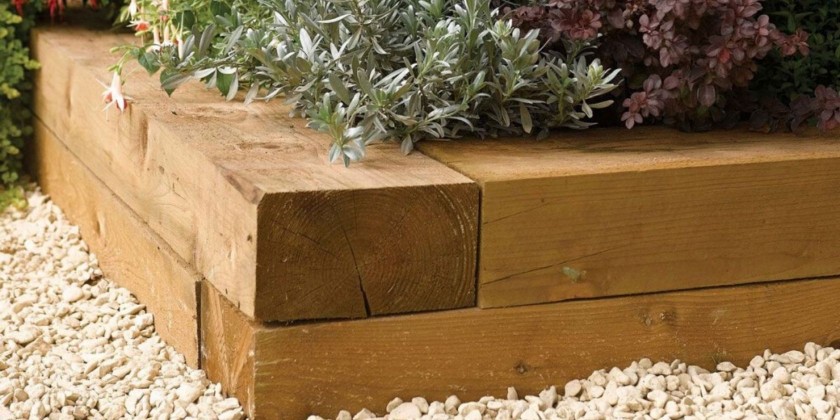
Fairygirl west central Scotland Posts. Mark out your bed area then cut the sleepers to length and cut the ends to overlap at corners. Maintain the 25mm step-back and ensure all sleepers are firmly fixed to the ones below.
I dug a shallow trench to bed the foot of the wall into drilled 16mm holes right through all the sleepers 800mm in from each end. Joining sleepers on top of each other. Again at least two screws per sleeper end is a good solid formula.
Simply now fasten the layers together with a screw that goes through the top layer to the layer below. Two screws per corner is a good solid formula. For extra detailing you can use a fine grit sandpaper to help expose the natural grain.
50mm of the length of the screw needs to drill into the adjoining sleeper to create a solid connection. Id lay they them on a bed of sharp sand and cement 3 to 1 say 2 inches deep. Cut the steel rod to be height of wall plus 1 metre below ground and hit them though the wall of sleepers with a sledgie.
Simply place the second layer on top of the first remembering to overlap the joints and simply screw through the second layer into the first layer below Repeat if you want a third layer. Continue building to the top. Hint use extensions on a speedbore bit.
Them id measure the bar so it came 2 inches less the the top of the beam and drill the dowel 2 12 in and tighten the two bolts together and fill top dowel. Post by BRUNO Thu Jul 12 2012 523 pm You could use rebar and plug the holes 16mm is what we use a flat bit and extension down through them then sledge to beat the rebar. Lay the second course on top of the first setting it back 25mm from the front.

30 Ideas For Raised Garden Beds Upcycle Art Small Backyard Landscaping Backyard Backyard Landscaping

Finished Retaining Sleeper Wall Steps Block Paving Driveway And Exterior Led Landscaping Retaining Walls Sloped Backyard Landscape Lighting Ideas Front Yards

Sleeper Retaining Wall Nature Coast Landscapes Sleeper Retaining Wall Wood Retaining Wall Wooden Retaining Wall

25 Ideas Garden Borders Ideas Landscape Edging Railway Sleepers For 2019 Raised Garden Garden Borders Sleepers In Garden
Building With Railway Sleepers How To Cut Lay And Join Garden Sleepers

Top 10 Ideas For Diy Retaining Wall Construction Top Cool Diy Backyard Retaining Walls Landscaping Retaining Walls Diy Retaining Wall

Garden Sleepers Ideas Garden Retaining Wall Ideas Wooden Railway Sleepers Steps Landscaping Retaining Walls Sloped Garden Sleepers In Garden

Wall Of Used Oak Railway Sleepers Slotted Into Rsjs Landscaping Retaining Walls Garden Retaining Wall Retaining Wall

Railway Sleepers Garden Gurus Creative Landscape Construction Built In Garden Seating Sleepers In Garden Corner Garden Seating

Sleepers In Garden Sloped Garden Garden Stairs Sleepers In Garden

Impressive Tips Can Change Your Life Fire Pit Wood Campfires Fire Pit Sand Fire Pit Quotes Art Lar Sleepers In Garden Railway Sleepers Garden Railway Sleepers

Garden Levelling Retaining Wall Stairs Benches From Railway Sleepers Youtube Garden Wall Designs Backyard Retaining Walls Garden Retaining Wall

Retaining Wall Design Hamilton Timber Retaining Walls Waikato Retaining Wall Fence Retaining Wall Design Retaining Wall
Building With Railway Sleepers How To Cut Lay And Join Garden Sleepers
Wow Creative Garden Bench Backyards Ideas 6507614312 Pottingbenchdiy Benchgarden Garden Seating Area Garden Seating Sleepers In Garden

Fixing Railway Sleepers Railway Sleepers Garden Railway Sleepers Sleepers In Garden

1 2m Mini Softwood Tanalised Sleepers Delivered Back Garden Design Outdoor Gardens Design Small Backyard Gardens

Model To Finding Out The Top Landscape Design Services In Canada Back Garden Design Garden Design Layout Garden Design

42 Beautiful Garden Bed Edging Ideas With Pictures Front Garden Design Small Front Gardens Small Garden Design